Sun Microsystems, Inc.   Sun System Handbook - ISO 3.4 June 2011 Internal/Partner Edition
   Home | Current Systems | Former STK Products | EOL Systems | Components | General Info | Search | Feedback

Rear Chassis Assembly

Servers: SPARC T3-4

511-1360 511-1363 511-1364 541-4181 541-4174
PCI Backplane Power Supply Backplane Centerplane Centerplane Assy Rear Chassis Assy/FRU

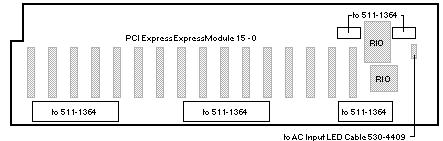
Front View PCI Express ExpressModule Backplane 511-1360
Shaded connectors are on the opposite side of the board


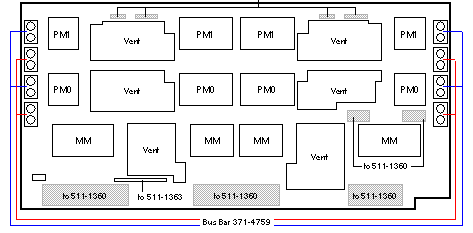
Front View Centerplane 511-1364
Shaded connectors are on the opposite side of the board


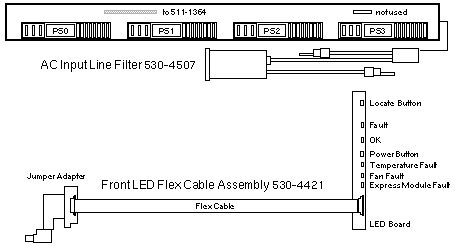
Front View Power Supply Backplane 511-1363
Shaded connectors are on the opposite side of the board


SPARC T3-4 Codename: Seville

Notes

  1. Midplane 511-1364 is fastened with T-15 Torx screws.
  2. Power Supply Backplane 511-1363 is fastened with T-15 Torx screws.
  3. PCI Express ExpressModule Midplane 511-1360 is fastened with T-15 Torx screws.
  4. The Backplanes and Midplane are not field replaceable.
  5. The AC Input LED Cable, Fan Cable, and AC Line Filters are not field replaceable.

Rear Chassis Notes

  1. There is approximately 4.5" (113mm) vertical clearance in the PCI Tray.
  2. Use a stubby #2 Phillips or a wide flat blade screwdriver to loosten two green screws
    on the bottom of the PCI Tray. (Xcelite SX102 or S141 and Wiha 31140 or 30465)

AC Line Filter Notes

  1. There are four AC Input Line Filters.
  2. Each Line Filter includes two ring terminals that connect to chassis ground.
  3. Line Filter access is through cover 341-6341 that is fastened with T-8 Torx screws.

Front LED Flex Cable Assembly Notes

  1. Assembly 530-4421 includes the LED Board, Flex Cable, and Jumper Adapter.
  2. Assembly 530-4421 is not available as a Field Replaceable Unit.
  3. The LED Board to Flex Cable connection is under the Left Side Bezel.
  4. The Jumper Adapter to Flex Cable connection is under cover 341-6262.
  5. The Jumper Adapter is fastened to the chassis with two hex head screws.
  6. The hex head screws are accessable through holes in the bottom of the chassis.
  7. Remove the chassis from the mounting tray to access the hex head screws.
  8. Use an M2.5 hex driver to remove/replace the hex head screws.

Processor Module Slot Notes

  1. Do not leave a Processor Module slot empty for longer than one minute.
  2. Replacement of Processor Module 0 requires power shut down.
  3. Replacement of Processor Module 1 does not require power shut down.
  4. A replacement Processor Module does not come on-line until power is cycled.

References

  1. SPARC T3-4 Server Product Notes
  2. SPARC T3-4 Server Service Manual

  Copyright � 2011 Sun Microsystems, Inc.  All rights reserved.
 Feedback